

Prerequisites
To complete this article, you need:
- less than 15 minutes
- an IDE
- JDK 8 or 11+ installed with JAVA_HOME configured appropriately
- Apache Maven 3.6.2+
- Cassandra installed somewhere ( Docker/Localhost/Datastax Astra/Serverless)
What can I expect from this article:
- Understand how easy and how perfect Quarkus Framework is
- Understand and write some sample code for Quarkus
- Writing code to connect to Cassandra DB
- Running Cassandra Cluster on your local machine
By executing steps below you are going to fetch some data from Cassandra Database and provide this as api response.
Why use Quarkus + Cassandra: With the Quarkus Cassandra extension, you need not to worry about all the other maven+ java configurations needed to build app in Java and focus on your business logic.😎
Step 1: Initialize your Quarkus/Maven project
mvn io.quarkus:quarkus-maven-plugin:1.12.0.Final:create
When asked for project details if you want to set project group id , artifactID,version + any extension you can add at this phase (Just to keep things simple, I kept everything as default):
Set the project groupId [org.acme]:
Set the project artifactId [code-with-quarkus]:
Set the project version [1.0.0-SNAPSHOT]:
What extensions do you wish to add (comma separated list) [resteasy]:
Do you want example code to get started (yes), or just an empty project (no) [yes]:
-----------
Here is an article with more specific explanation : QUARKUS - CREATING YOUR FIRST APPLICATION
After this step you will see a default/example generated code with Rest-Resource :
package org.acme;

import javax.ws.rs.GET;
import javax.ws.rs.Path;
import javax.ws.rs.Produces;
import javax.ws.rs.core.MediaType;

@Path("/hello-resteasy")
public class GreetingResource {

    @GET
    @Produces(MediaType.TEXT_PLAIN)
    public String hello() {
        return "Hello RESTEasy";
    }
}
We are going to write someting like this only.
Step 2: Add cassandra Quarkus Extension You can add Cassandra Quarkus extension to already created maven/Quarkus project with one of below :
Use below command to add it with Maven
./mvnw quarkus:add-extension -Dextensions="com.datastax.oss.quarkus:cassandra-quarkus-client"
To add with Gradle
./gradlew addExtension --extensions="com.datastax.oss.quarkus:cassandra-quarkus-client"
To add directly to POM.xml file
        <dependency>
            <groupId>com.datastax.oss.quarkus</groupId>
            <artifactId>cassandra-quarkus-client</artifactId>
        </dependency>
Compile and run project in dev mode using$ mvn quarkus:dev
browse to localhost:8080 just to make sure it works 😉
Step 3: Cassandra configurations
Before moving ahead, we will make sure that we have a instance of cassandra running on our machine. I am using Docker to run a Cassandra database.
docker run \
   --name local-cassandra-instance \
   -p 7000:7000 \
   -p 7001:7001 \
   -p 7199:7199 \
   -p 9042:9042 \
   -p 9160:9160 \
   -p 9404:9404 \
   -d \
   launcher.gcr.io/google/cassandra3
Next : Create the keyspace and table by executing below cql(Cassandra Query Langunage) commands, that will be used by our application.
a. Execute below command to get to cql shell:
docker exec -it local-cassandra-instance cqlsh
b. Create a keyspace :
cqlsh> CREATE KEYSPACE IF NOT EXISTS k1 WITH replication = {'class':'SimpleStrategy', 'replication_factor':1};
c. Create a table:
cqlsh> CREATE TABLE IF NOT EXISTS k1.test_table(id text, name text, description text, PRIMARY KEY((id), name));
d. Insert some sample data to this table :
cqlsh> insert into k1.test_table(id,name,description) values ('1','tatya','tatys first entry to cassandra') ;
e. Just to make sure that our data got into the table 😅 :
cqlsh> select * from k1.test_table ;
 id | name  | description
----+-------+--------------------------------
  1 | tatya | tatys first entry to cassandra
(1 rows)
cqlsh>
Now, Lets do configurations to connect to Apache Cassandra .Browse to resources directory of current Maven project and edit application.properties with below configurations :
A sample configuration should look like this:
quarkus.cassandra.contact-points={cassandra_ip}:9042
quarkus.cassandra.local-datacenter={dc_name}
quarkus.cassandra.keyspace={keyspace}
In this example, we are using a single instance running on docker localhost, and the keyspace containing our data is k1, and the default datacenter for cassandra is datacenter1:
quarkus.cassandra.contact-points=127.0.0.1:9042
quarkus.cassandra.local-datacenter=datacenter1
quarkus.cassandra.keyspace=k1
If you want to connect to a cloud DataStax Astra database:
You have to provide secure-connect-bundle, which points to Path to Astra secure connect bundle Zip File , as well as username andpassword, since authentication is always required on Astra clusters.
A sample configuration for DataStax Astra should look like this:
quarkus.cassandra.cloud.secure-connect-bundle=/path/to/secure-connect-bundle.zip
quarkus.cassandra.auth.username=john
quarkus.cassandra.auth.password=s3cr3t
quarkus.cassandra.keyspace=k1
Step 4: Inject QuarkusCQLession + Write queries Now Inject QuarkusCqlSession to our existing class as below :
package org.acme;

//other import statements are ommitted here

import com.datastax.oss.driver.api.core.cql.Row;
import com.datastax.oss.quarkus.runtime.api.session.QuarkusCqlSession;


@Path("/hello-resteasy")
public class GreetingResource {

        @Inject QuarkusCqlSession cqlSession;
//rest resources/methods / other code   is ommitted

}
Now Lets modify our hello method with below code :
@GET
    @Produces(MediaType.TEXT_PLAIN)
    public String hello()throws Exception {

        String response ="";
        //Here comes our main thing, a real query to Cassandra
        java.util.List<Row> rs=   cqlSession.execute("SELECT id,name,description from k1.test_table").all();

        //as every database query returns a resultset we are going to extract data from the resultSet and return as api response :

        for(com.datastax.oss.driver.api.core.cql.Row rw:rs) {

            System.out.println(rw.getFormattedContents());
            response+=rw.getFormattedContents()+"\n";
        }

        return response;
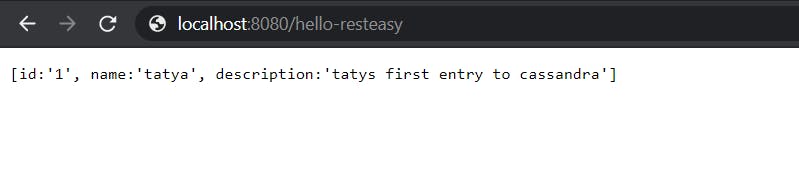
Step 5: Run /Build + -> Boom the data is ready!!
As we already have the project running in dev mode, we don't have to recompile it , Quarkus does it automatically.
We just need go to browser and visit localhost:8080/hello-resteasy and observe the output
You can get source code of this program on Git repo: https://github.com/k-ravin/Quarkus-Cassandra
Congratulations!!! You have written your first Program with Quarkus and also connected it with Cassandra.